
Guest Sewist: Connie
PDF Sewing Patterns being used for this Mash-Up:
This is a super simple hack that leaves tons of room to get creative! Follow along, and in the words of my two-year-old (which, let’s be serious, he probably copied from me), LET’S DO THIS THING!

First thing’s first, you’ll need the fabulous Roxy Raglan pattern. It’s a quick sew with a fantastic fit! It comes in child and adult sizes, and my family has about a billion of these in our closets.

You’ll actually start by constructing a Roxy exactly according to the pattern to give you a solid base for this hack. The adult pattern is drafted for a height of 5’9”. I am 5’6” tall, but I did not make any height adjustments, because I personally like a longer shirt to start with for this gathering hack. One thing to note on my version is that I cut along the wider, adjusted neckline on the pattern pieces for a slightly looser look.

I did make one change to the basic Roxy before starting this gathering hack. Instead of hemming my sleeves per the pattern instructions, I cut cuffs. If you prefer to skip the cuffs, simply hem the sleeves to your desired length. If you’d like to add cuffs though, it’s easy!
As a starting point, just measure the opening of your finished sleeve before hemming, multiply that by 0.85, and use that as the length of your rectangular cuff pattern. Always check the fit of your cuff before sewing it on to be sure it’s not too tight or too loose, and adjust accordingly. The height of the rectangle will just be equal to double the height of the finished cuff that you prefer, plus seam allowance. My rectangle was 7" tall, which resulted in a finished cuff that was roughly 3” tall after seam allowances. You may also want to cut some length from the sleeve before attaching the cuff. For reference, I cut approximately 3.5" from the bottom of each sleeve to accommodate this size cuff and the length of my arm.

Now that your Roxy is all finished (including hemming the bottom), it’s time to get into the juicy part of this hack! The gathering at the hem is achieved using a simple casing and a piece of ribbon. Let’s break things down.

Ribbon and Casing Dimensions: These two decisions go hand in hand, and here is the order I tackled them! Just a note, if you don’t have any coordinating ribbon on hand, you can always use your fabric scraps to make some, similar to making double-fold bias tape!
1. Choose the width of your ribbon: I used an inexpensive 5/8”-wide, ribbed polyester ribbon and it worked out well, but you can definitely experiment with different widths.

2. Using the two points below as a guide, cut a rectangle of fabric to create your casing: A simple rectangle sewn onto the back side of your shirt will create the casing needed for gathering. This rectangle will not be visible from the front, so it can come from any of your non-fraying scraps.
A. Casing Width: Double the width of your ribbon and add ¼” to account for seam allowances. Since I used 5/8” ribbon, my casing was exactly 1.5” wide.
CASING WIDTH = RIBBON WIDTH x 2 + ¼”

3. Cut your ribbon to length: Now that you know the height of your casing, double it and add a few inches to allow room to pull it when gathering. I chose to add 6”, but this was totally a random decision. Since the casing will be cinched, you will gain the extra length you need to tie the bow once the shirt is gathered. Regardless, adding a total of 6” worked well for me, which made my overall ribbon 32” in length, for reference.
RIBBON LENGTH = CASING HEIGHT x 2 + 6”
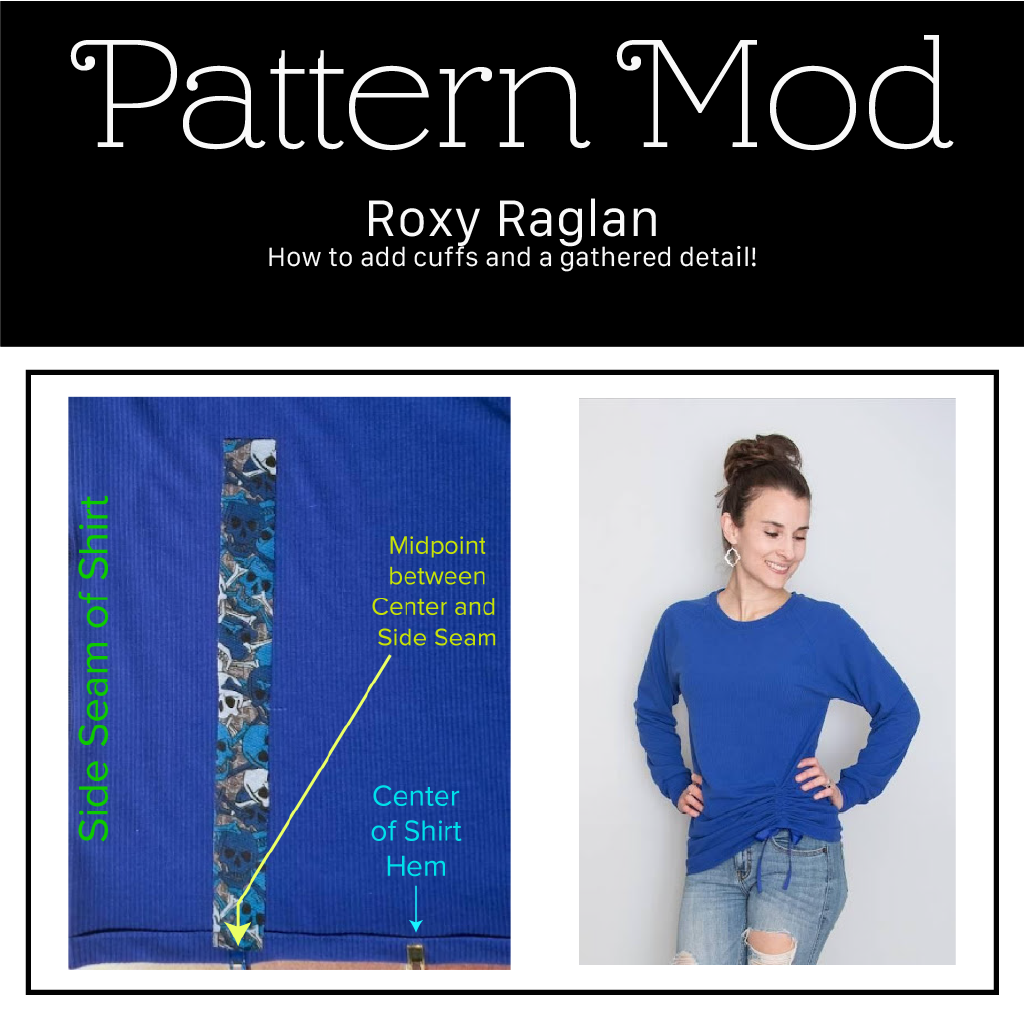
Positioning and Sewing Your Casing: Because you cut your casing from a fabric which does not fray, there is no need to finish the edges. You can choose any location along the hem to place the casing, but as a guide, I used half the distance between the midpoint of the shirt front and the side seam. Feel free to mix it up a bit, though!

Turn your shirt inside out and lay your casing at the chosen location, roughly ½” above the folded hem. Pin and sew the long edges of the casing in place using a 1/8” seam allowance, leaving the bottom and top edges of the casing open and unsewn relative to the hem of the shirt. Leaving the top edge of the casing open at this step is especially important to make it easier to feed the ribbon through later. Ask me how I know! :-)

Next, stitch a line up the center of your casing that extends from the bottom of the casing. Be sure not to stitch all the way to the top of the casing; you’ll need to leave a space roughly equal to the width of your ribbon so that it can pivot as you are feeding it through.

Feed your ribbon up one side of your casing, out through the top, and then back down the other side using a safety pin.

Both ribbon tails should be sticking out of the casing down along the hem. Adjust the tails so that they are equal in length. Then stitch the top edge of the casing closed. Don’t stress too much if you catch some of the ribbon in this seam. As long as your tails are even, tacking the ribbon in place at the top of the casing may actually be a blessing in disguise!

To finish the raw edges of your ribbon, you have a couple of options. If the ribbon is made of synthetic fibers like polyester, you can (carefully!) singe the edges with a match or lighter to melt them and prevent them from fraying. If the thought of this terrifies you, or for ribbon made from natural fibers like cotton, simply fold up the raw edge twice about ¼” and topstitch instead.
Finally, put that sucker on, cinch your hem, tie the ribbons, and POW! You’re a rock star. Thanks so much for reading!